Adaptive Feedback Microscopy ImageJ/FiJi utilities
The repository adaptive_feedback_mic_fiji contains ImageJ/FiJi tools to be used with the Zeiss VBA macro MyPiC to perform adaptive feedback microscopy experiments.
Adaptive feedback microscopy Experiments where the microscopy software interacts with an image analysis software. The image is processed and depending on the results a different imaging protocol is started.
The Automated FCS plugin monitors a folder for new images generated by MyPiC and the LSM microscope. When a file matches a specified task in a pipeline the image is processed according to:
- Gaussian blurr and threhsold using a specifed channel of the image
- Seeded watershed for objects that exceed a certain area size
- Pick objects of interest that are within an area size range and fluorescence intensity range
- If an object is found send stage position(s) and/or FCS position(s) (computed with respect to the object of interset) to MyPiC
- Send to MyPiC which action to perform, e.g. update stage position for tracking or FCS measurements
 Installation
Install FiJi to a directory where you have writing rights.
Without compiling the jar files
- Create a directory in the FiJi plugin directory e.g.
Fiji.app\plugins\EMBL - Copy the jar files and the python file contained in the
distdirectory of this repository to the newly create directory.
Compilation of the jar files
- Install maven
- Open a command line tool.
- Change directory to
automatedfcsand typemvn packageto compile the package. If the compilation is succesful the jar file is stored in a newly createdautomatedfcs\targetdirectoy. - Repeat point 3. in the directory
segment_ParticlesandCommMicroscope. - Copy the jar files and the python file located in the
distdirectory to the FiJi plugins directory as explained before. - Get the commons-io java library (version >= 2.5, the plugin has been tested with common-io-2.5.jar) and copy the jar file to the FiJi plugins directory.
Running the Automated FCS plugin
The wiki contains following sections:
- Start the plugin
- Directory to monitor and parameters GUI
- Image to analyse parameters
- Segmentation parameters
- FCS measurement points parameters
- Test and save settings commands
- Start monitoring commands
Start the plugin
You can start the plugin from Plugins > EMBL > Automated Fcs.
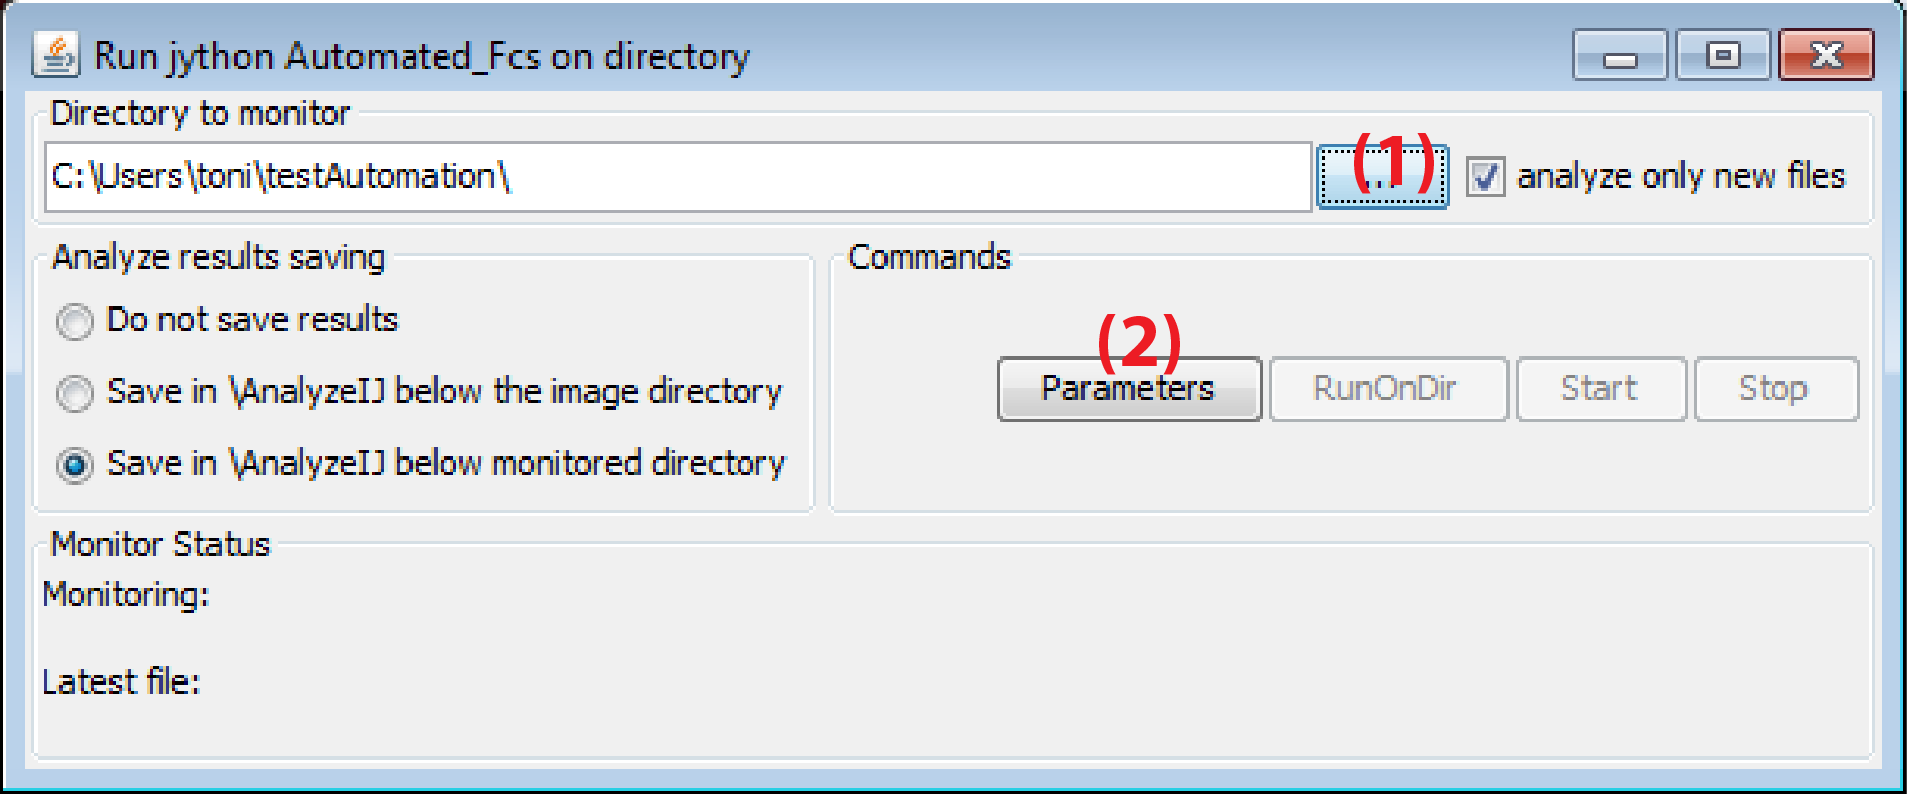
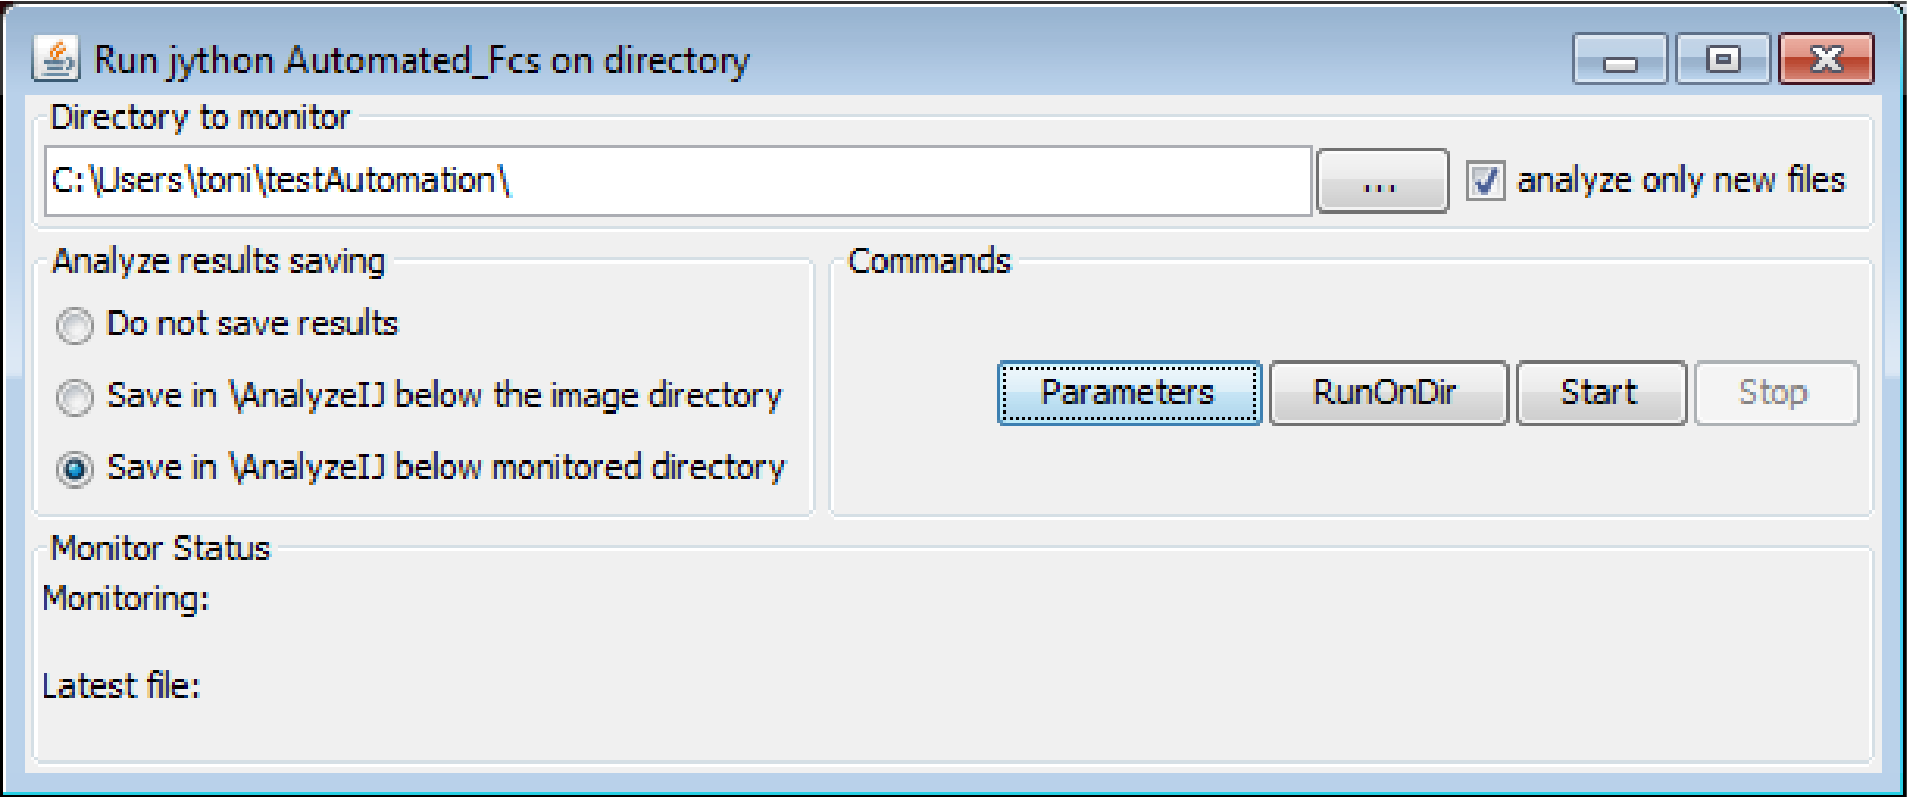
Directory to monitor and parameters GUI
This directory is the directory where MyPiC saves the data.
| Main window | Parameter window |
|---|---|
 |
 |
- In the field
Directory to monitorspecify the directory where the data from MyPiC is stored - Click on
Parameters - This will open a window where the user can enter the specifications for the image analysis
Image to analyse parameters
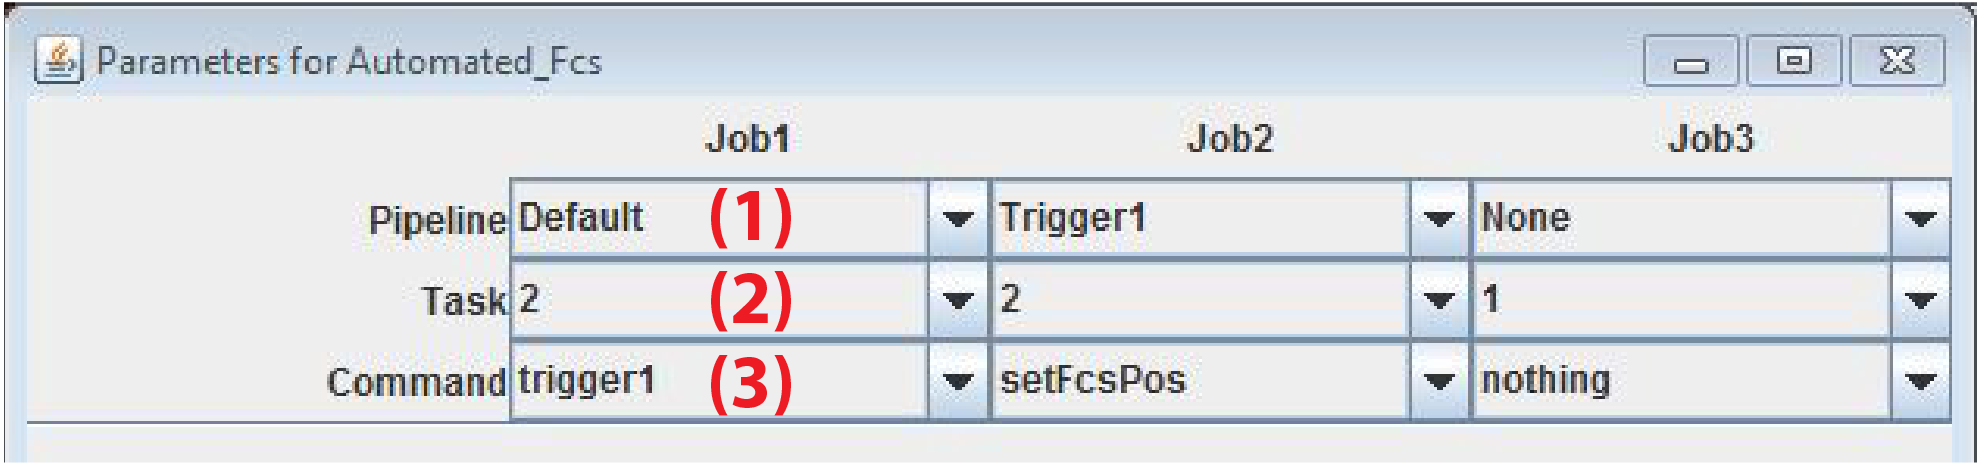
The user can specify up to 3 images that will be analysed by the plugin (Job1-3). The images should match to MyPiC task where processing is set to Online image Analysis
-
ImageName of pipeline from MyPiC to analyse
None - do not perform any analysis
Default - Files with name*DE*from default pipeline
Trigger1 (Trigger2) - Files with name*TR1*(*TR2*) from Trigger1 (Trigger2) pipeline -
Img. TaskTask to be analysed. This is the image number in the order of acquisition of the pipeline -
CommandCommand to pass to MyPiC
nothing - do not perform any action
focus - compute XYZ of center of mass of the segmented binary object. MyPiC updates the stage position accordingly. This is used for tracking objects in 3D.
setFcsPos - pass XYZ position(s) for FCS measurements specified in FCS measurement points. MyPiC starts FCS measurements at these positions
setFcsPos;focus - MyPiC first performs FCS measurements and then updates the stage position according to the center of mass of segmented object
trigger1 (trigger2) - MyPiC starts Trigger1 (Trigger2) pipeline at XYZ of center of mass of segmented object(s). Several stage positions can be specified at once usingNumber of particles>1 andPick particle in= many
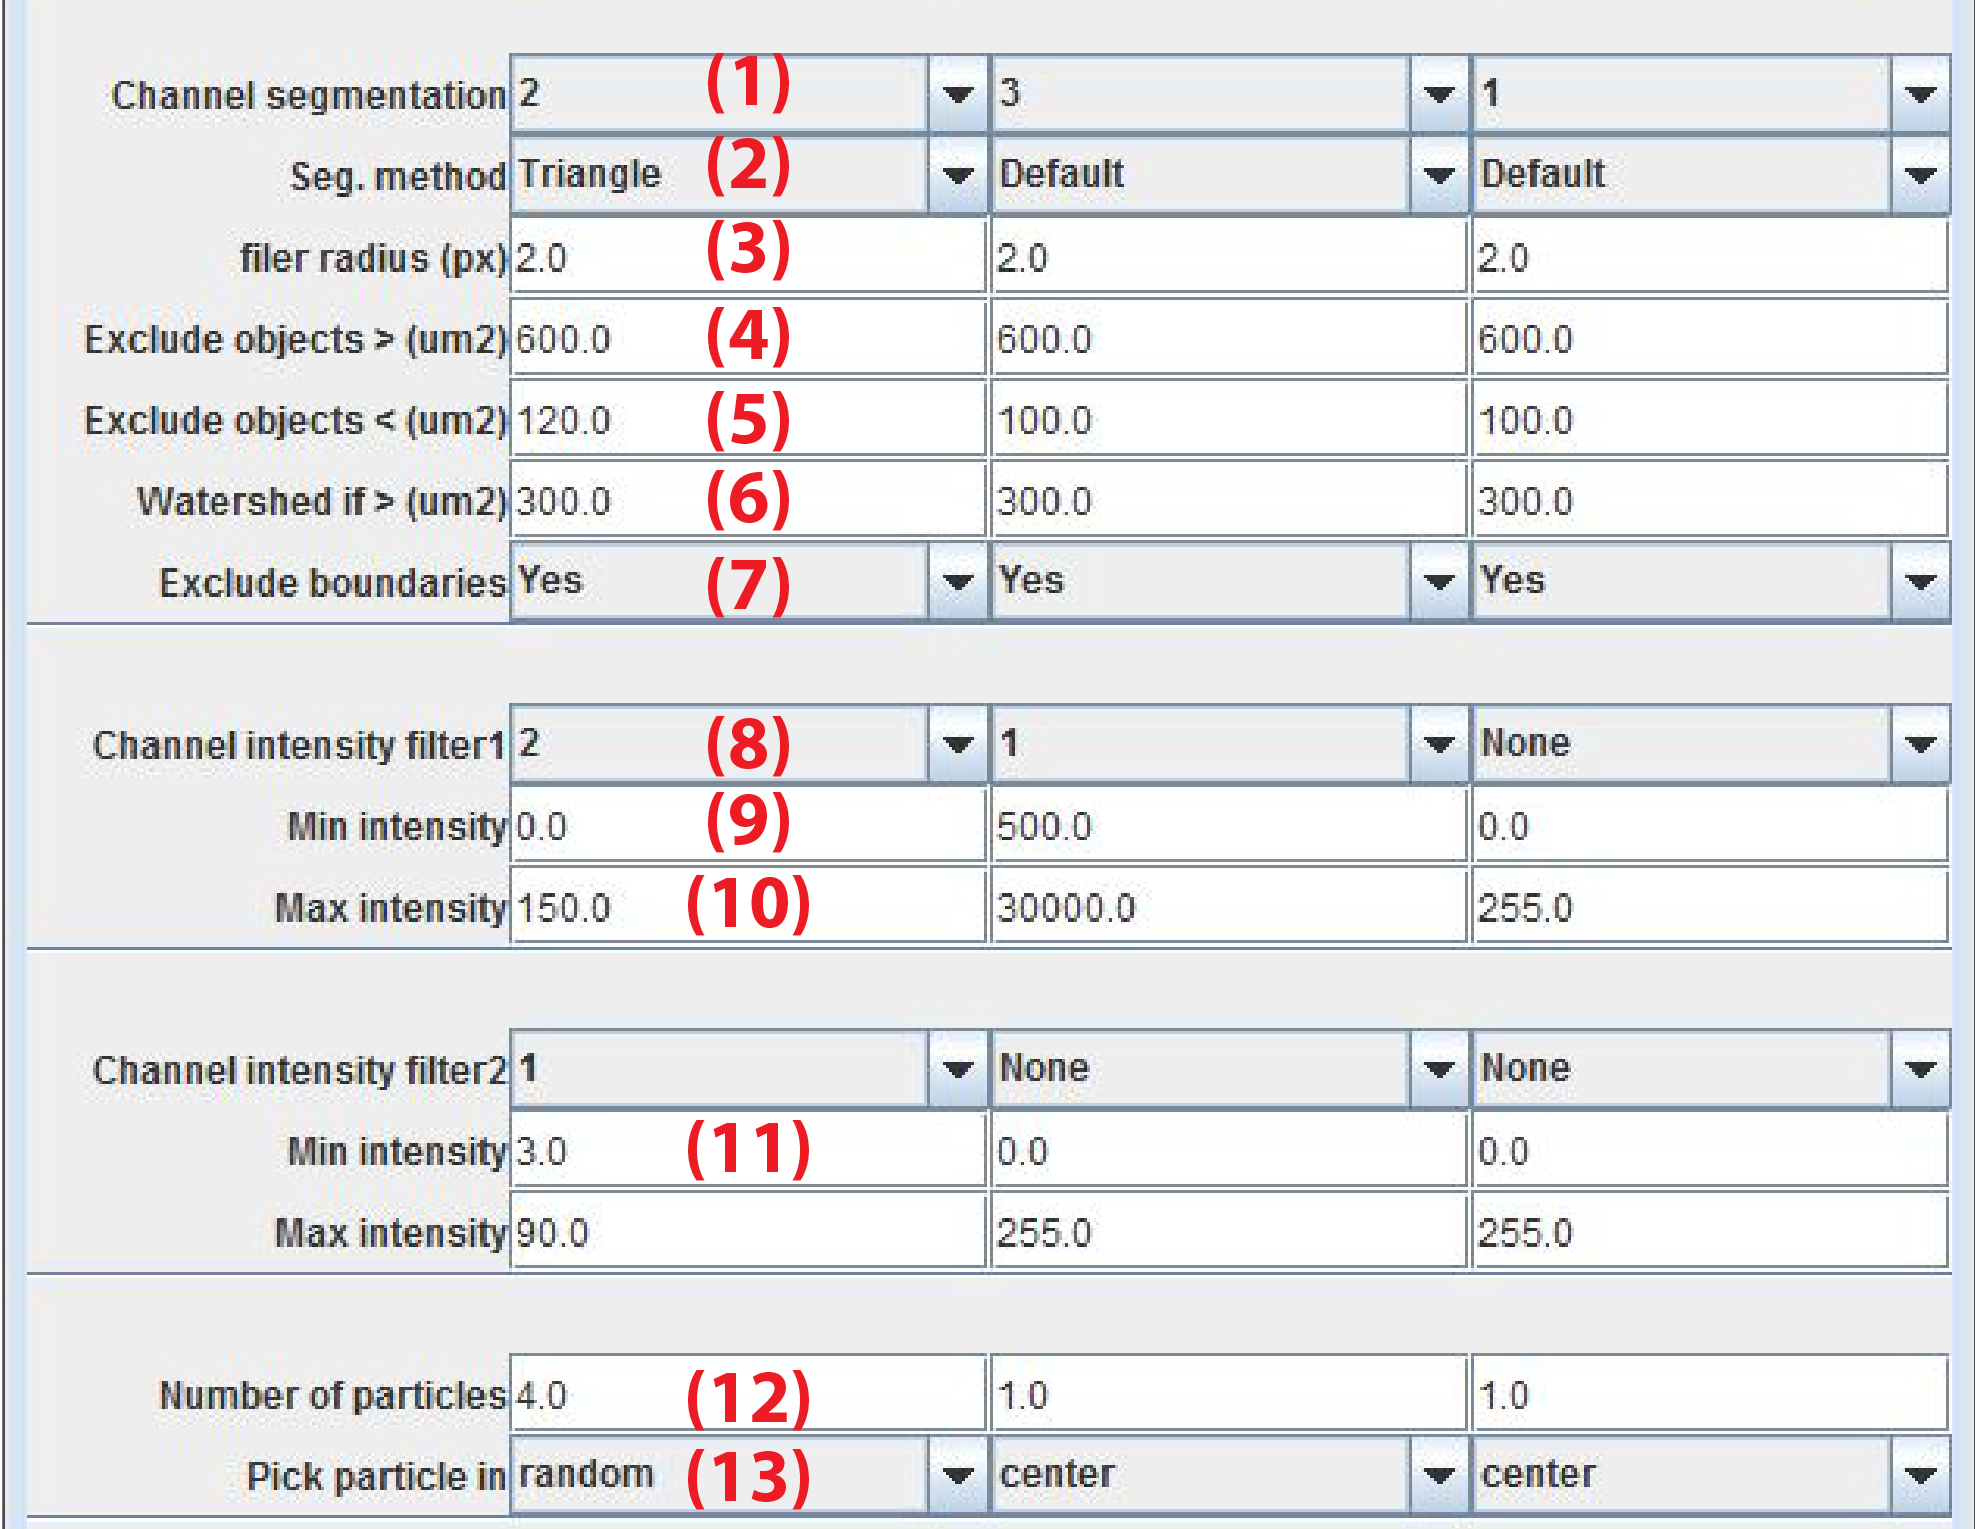
Segmentation parameters
After segmentation objects that are within a certain area range and fluorescence intensity range are selected. From these objects the plugin picks one or more objects to be used for specifying imaging coordinates and FCS positions.
-
Main seg. ChannelChannel to use for object segmentation -
Seg. MethodMethod to find threshold to separate foreground and background pixels. The name refer to the method as implemented in ImageJ. -
filter radius (px)Radius in pixels of the gaussian filter applied on the image before thresholding -
Exclude objects > (um2)Exclude objects above area-size in micrometer^2 -
Exclude objects < (um2)Exclude objects below area-size in micrometer^2 -
Watershed if > (um2)Perform a watershed operation on objects that exceed area. This parameter is useful to separate objects that are in close proximity. -
Min mean intensityThe mean fluorescence intensity for each object of interest must be above this value. -
Max mean intensityThe mean fluorescence intensity for each object of interest must be below this value. -
Exclude boundariesIf yes objects touching the boundary are excluded -
Number of particlesMaximally allow for this number of objects -
Channels intensity filter1/2Specify one or two additional channels for which the fluorescence intensity must be in a certain range -
Pick particle in
center choose one particle closest to the center of the image. This allows for tracking an object through time and space.
random choose one particle at random.
many choose several particle at random. The maximal number of particles is specified byNumber of particles
The default
Max mean intensityvalues are for 8bit images. This needs to be increased for 12bit (maximum intensity 4093) or 16bit (maximum intensity 65536) images
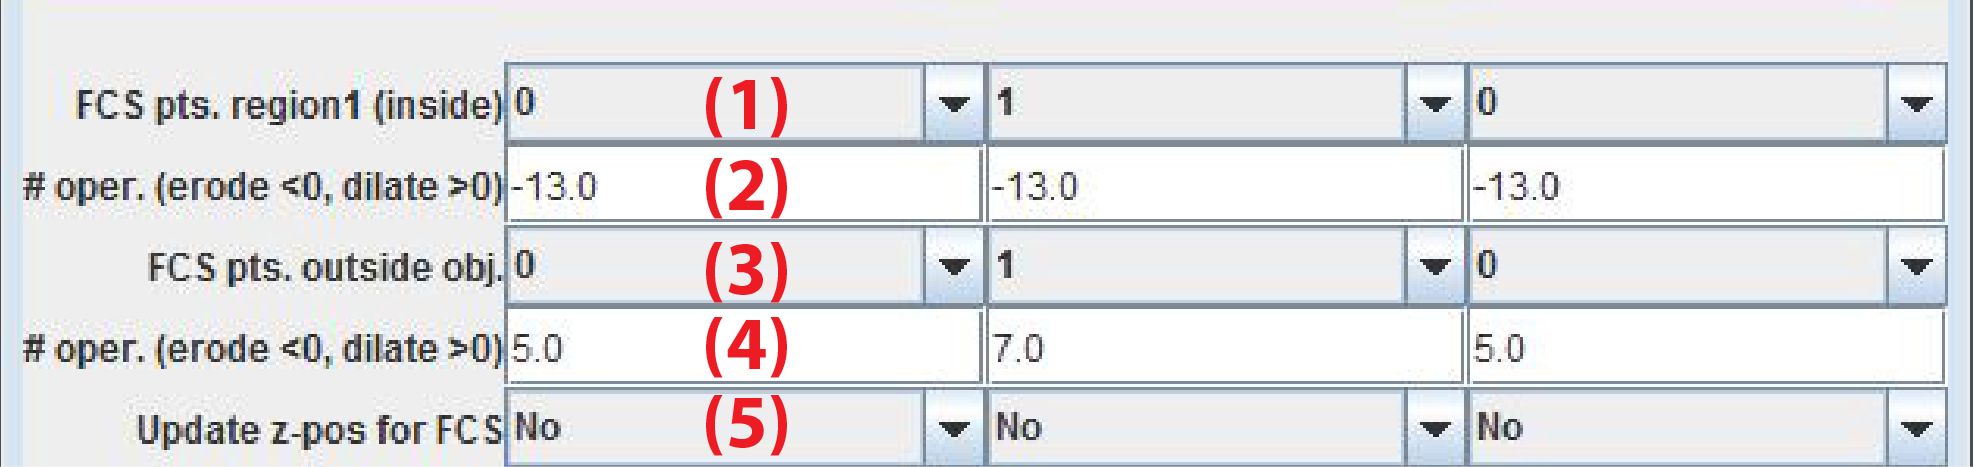
FCS measurement points parameters
Note that FCS measurements are only performed by the microscope if the plugin sends the command setFcsPos or setFcsPos;focus to MyPiC. The points are placed so that they are as distant as possible. For example for 4 points the FCS points are located on 2 orthogonal lines. The user can specify the distance from the boundary of the segmented primary object.
-
FCS pts. inside objNumber of FCS points inside object of interest. The id of these points is nuc (nucleus) -
# pixel erodeNumber of erosion operations of segmented object of interest -
FCS pts. outside objNumber of FCS points inside object of interest. The id of these points is cyt (cytoplasm) -
# pixel dilateNumber of dilation operations of the segmented object of interest -
Update z-pos for FCSIf Yes FCS measurments are performed on a new Z-position set from the center of mass of the segmented object of interest
Test and save settings commands

-
Run on fileTest the analysis pipeline on a user defined file. The program will prompt for a file -
Load ParaLoad parameters from a file named Automated_FCS.ini. Such a file is automatically generated after pressingStart. -
Save ParaSave parameters to a manually specified *.ini file -
OKClose window and go back to main window
Start monitoring commands
To start the plugin and automatically process files created in the directory to monitor press Start.
If analyze only new files is clicked only new generated files are processed. In case you restart MyPiC in the same folder old files need to be deleted. If this option is not on, the plugin looks for changes in the files. In this situation it can occur that the plugin processes one file twice.